WHAT YOU WILL NEED :

  • A piece of paper and a pencil or pen to record your notes
  • Tape measure (metal ones are best)
  • A ruler (to help draw straight lines & arrows)
  • If your space is large, you’ll need a second person to help you

Take all your measurements in millimetres (mm).

Step 1 : A rough floorplan

Consider how your room would look from a birds’ eye view (looking down from the roof).

Now make a rough sketch of the perimeter of your room from this perspective. Don’t stress! This doesn’t need to be perfect or to scale – it is just so you can mark down measurements in a logical way. Use a ruler if you like, to help you get straight lines.

Label each wall with a letter so that we can cross-reference the matching photo later.

(In our questionnaire during the online purchase process we’ll ask you to upload photos of each wall, labelled with the corresponding letter).

Make notes of where windows and doors are located.

Sketch in door swings to show which way the doors open.


Step 2 : Adding main wall measurements

Draw an arrow for each wall on the outside of your floorplan.

Note that you will be measuring the walls when standing inside the room. But we suggest you mark these main measurements on the outside of the plan to allow space for adding other measurements later on.

Using a metal tape measure – measure the width of each main wall and mark these down on the lettered arrows that you’ve already added to the floorplan.

Make sure that these main wall measurements are the overall wall size (not partial measurements between windows etc, as we will add these later).

Get someone to help you hold one end of the tape measure if you need to.

Step 3 : Adding partial wall measurements

Draw an arrow for each partial wall measurement on the inside of your floorplan (include one for each door, window and wardrobe too).

Using a metal tape measure – measure the width of each partial wall / window / door and mark these down on the arrows that you’ve already added to the inside of the floorplan.

For Window and Door widths – please include the frames in your measurements (not just the glass width).

Your partial wall measurements should be measured to the outside of frames.

These detailed measurements help us to properly assess the space in your room and consider what limitations and opportunities there might be when designing your space.

Step 4 : Adding in the final details

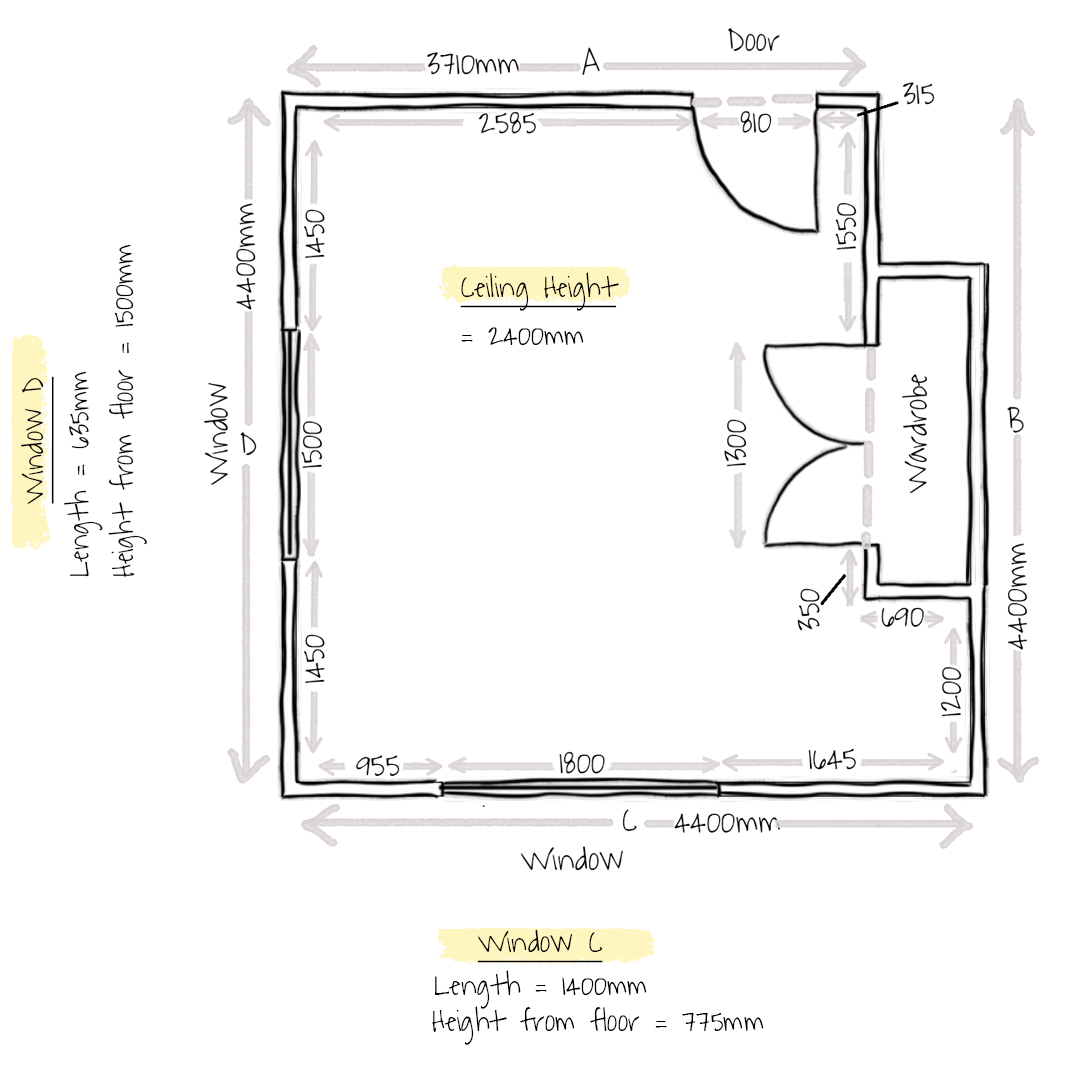
We now need to address the key vertical measurements (height/lengths) of the ceiling and the windows.

Using a metal tape measure – measure the height of the ceiling from the floor. Mark this somewhere visible on the inside of your floorplan.

Measure the length (top to bottom) of the windows & include frames in this measurement. Now mark these down on the outside of the floorplan, near the corresponding window.

Measure the height from the floor to the bottom of each window frame. Mark these on your floorplan underneath your window lengths.

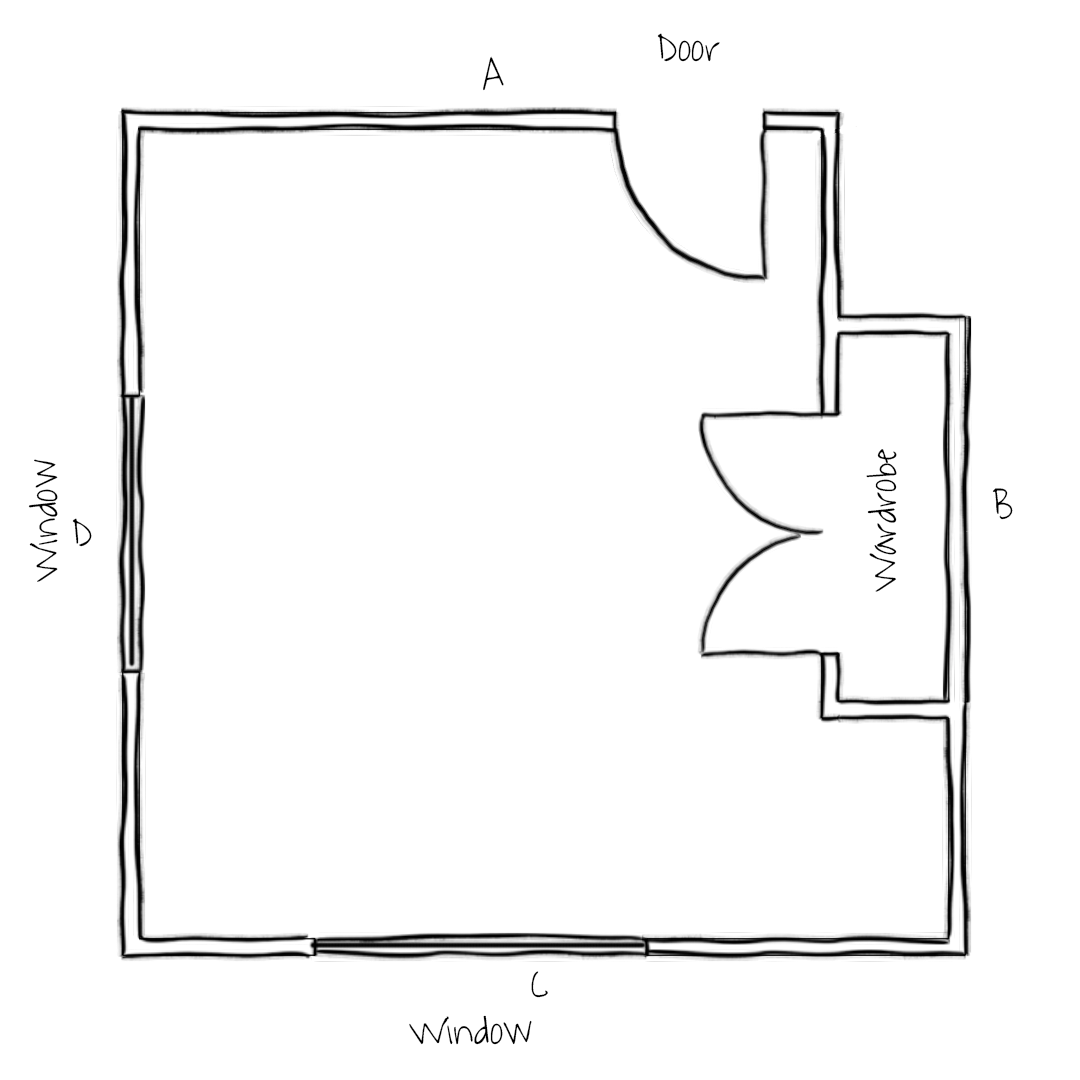
It is helpful to label these notations as ‘Window A, B, C’ as it relates to the letter you assigned each outer wall. This makes it easier to communicate any queries later on.

Note: If you have more than one window on a wall, then you can label with a letter then a number e.g. ‘Window A1 / Window A2’.

Step 5 : Take photographs

Turn on the lights & open the curtains / blinds.

Take photos in landscape mode

Stand at the centre of each main wall and take 1 photo pointing the camera straight ahead to the opposite wall. Do your best to capture the whole wall in the picture (top, bottom & both sides).

It is best if the room is clutter free and there are no unnecessary objects obstructing a clear view of the room. But you do not need to clear the room of all furniture.

Label each photo with the corresponding wall letter that you assigned in the steps above (i.e. ‘Wall A’, ‘Wall B’, Wall C’, ‘Wall D’).

You may wish to download a copy of this guide to refer to offline Measuring Guide PDF